

How To Prevent Text Changes In C#
This commodity explains how to place text on a scene in Unity.
In the first half of the article, nosotros will explain how to utilize Unity's default text feature.
In the 2d one-half of the article, we will explain how to use Text Mesh Pro.
- 1 Samples
- 2 Placing Text
- 2.i How to Create Text on Sail
- 2.i.i Inspector Settings
- 2.1.2 When the Text is Blurred
- 2.one.3 Virtually Render Mode
- 2.2 How to Create 3D Text
- ii.2.i Inspector Settings
- 2.two.ii When the Text is Blurred
- 2.2.3 Text is Displayed at the Forefront
- ii.iii How to Alter or Add Fonts
- 2.3.1 Changing the Font
- ii.3.ii Adding a Font
- 2.i How to Create Text on Sail
- 3 Placing Text Using Text Mesh Pro
- three.i How to Install Text Mesh Pro
- three.2 How to Create a Text
- 3.two.1 How to Create Text(TMP) on Canvas
- iii.2.2 How to Create a 3D Text (TMP)
- 3.3 Setting upwardly Text Mesh Pro
- 3.four How to Change the Font
- 4 How to Upload to STYLY
Samples
Here are some sample images of various text.
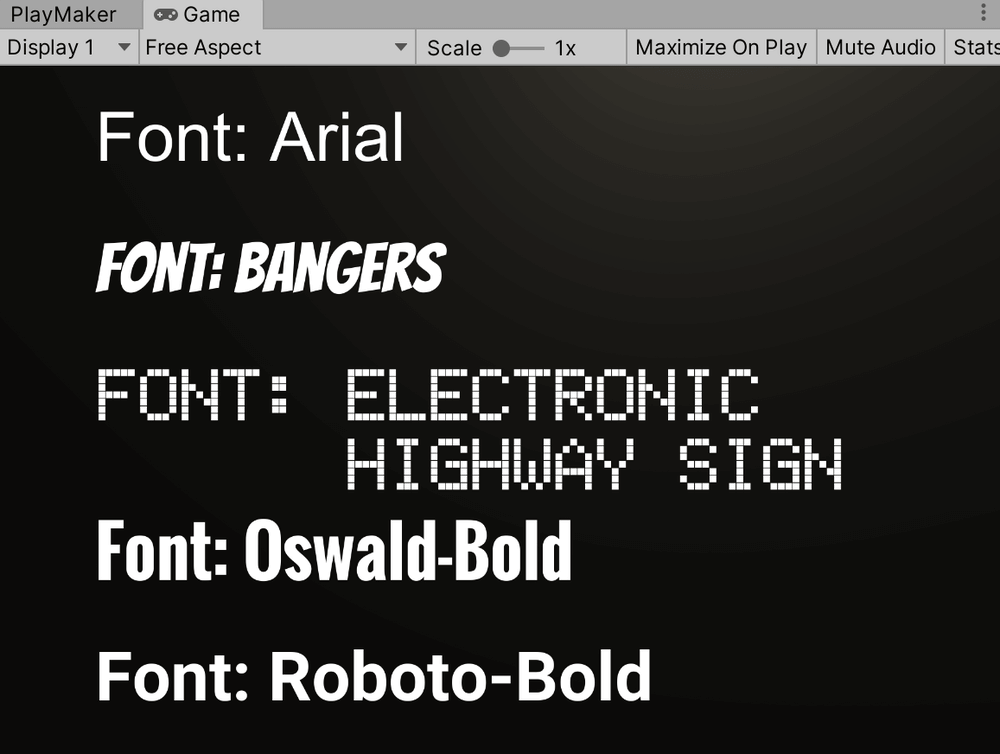
Various fonts.
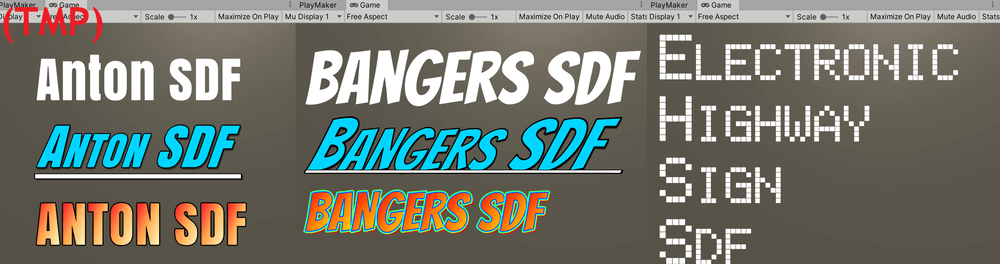
Various decorations of Text Mesh Pro.

Text of Earth Space.

Text of Screen Infinite.
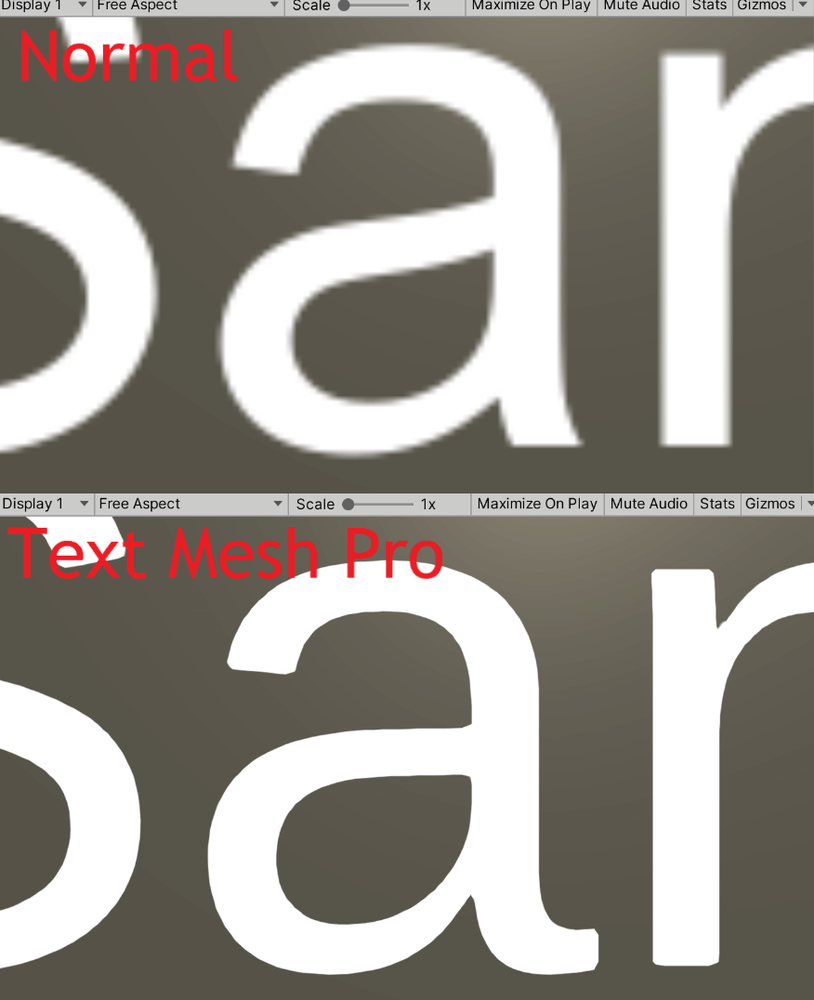
Zoomed comparison of normal text and Text Mesh Pro text.
Placing Text
In that location are ii ways to place text in a scene.
1 is to create a Text on Canvas, and the other is to create a 3D Text.
Both methods will be explained below.
How to Create Text on Sheet
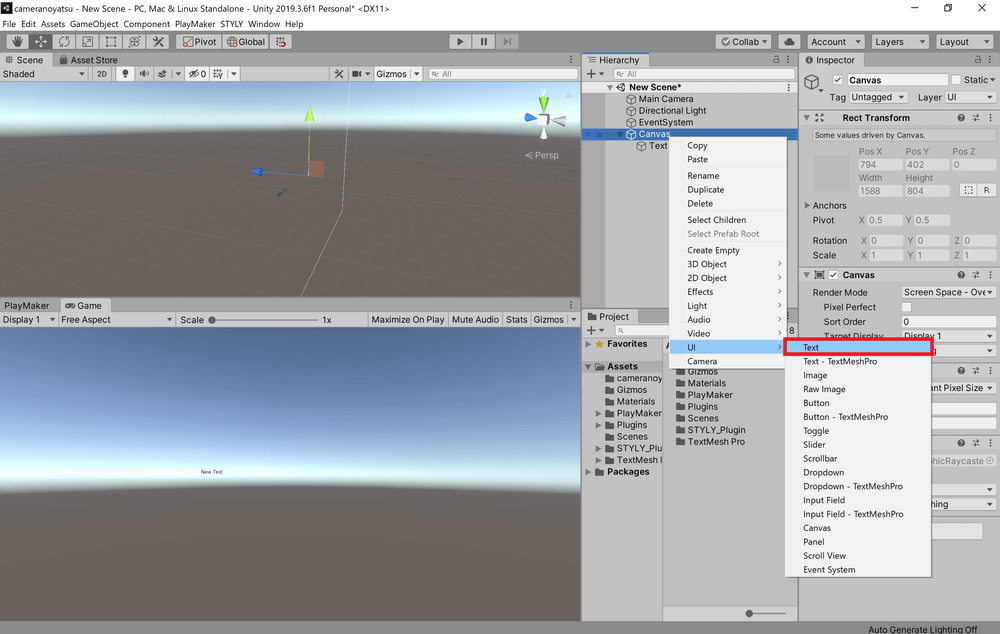
If at that place is not a Canvas in your scene, click "GameObject" at the top of the screen, and select UI→Text.
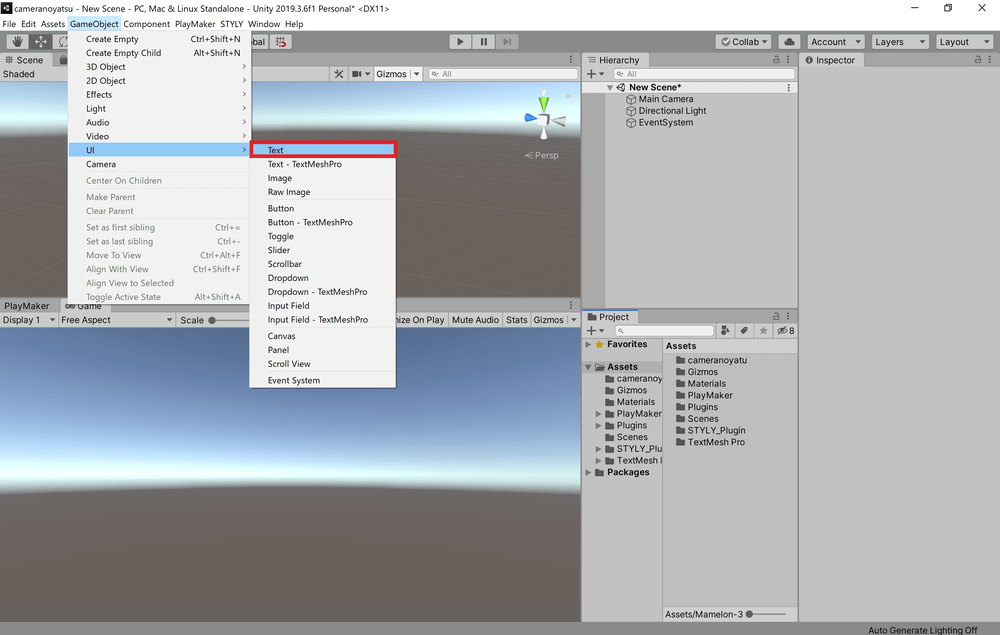
Click on GameObject from the tab at the top of the screen, and select UI→Text.
A new Canvas is created at the same time as the Text.
If yous already have a Canvas in your scene, right-click on the Canvas you want to add text to in the Hierarchy window, and select UI→Text.
Right-click on the Sail and select UI→Text.
Too, you can rename the newly created Text and Canvas as yous wish.
Inspector Settings
The Inspector for the text yous created contains a component chosen "Text".
By modifying this component, you lot tin give diverse changes to the text.
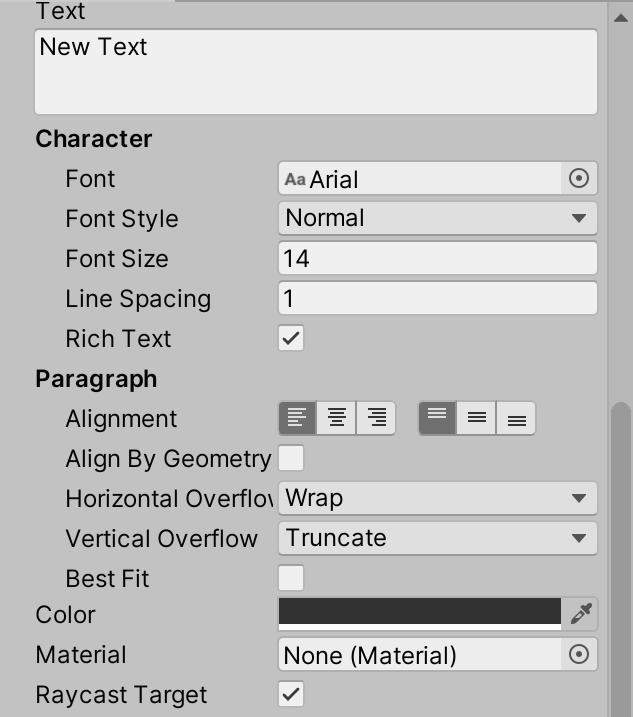
Text component.
The following table summarizes some of the virtually commonly used properties of Text.
| Property Proper name | Description |
| Text | Allows yous to enter text. |
| Font | You can alter the font of the text. |
| Font Style | Allows yous to change the text to bold, italic, etc. |
| Font Size | Allows yous to modify the size of the text. |
| Line Spacing | Allows you to change the line spacing. |
| Rich Text | If checked, tags can exist used. |
| Alignment | Allows you to change the alignment of the text past a combination of horizontal and vertical alignment. |
| Horizontal Overflow | If checked, the text volition be displayed horizontally beyond the text frame. Wrap will wrap the text horizontally then that it fits into the text frame, and truncate the text that even so extends horizontally. |
| Vertical Overflow | When set to Overflow, the text will be displayed vertically out of the text frame. If Truncate is checked, the text volition be truncated vertically so that information technology fits into the text frame. |
| Best Fit | If checked, the Font Size will exist automatically adjusted so that the text fits into the frame. The Min Size and Max Size displayed when checked are the lower and upper limits of the Font Size that will be automatically adjusted. |
| Colour | Allows y'all to change the color of the entire text. |
| Textile | Allows y'all to employ a cloth to the text. |
| Raycast Target | Check this box to cast a ray. |
When the Text is Blurred
If the displayed text is blurry and hard to read, y'all tin can improve it by increasing the Font Size of the Text component and decreasing the Calibration of the Transform component.
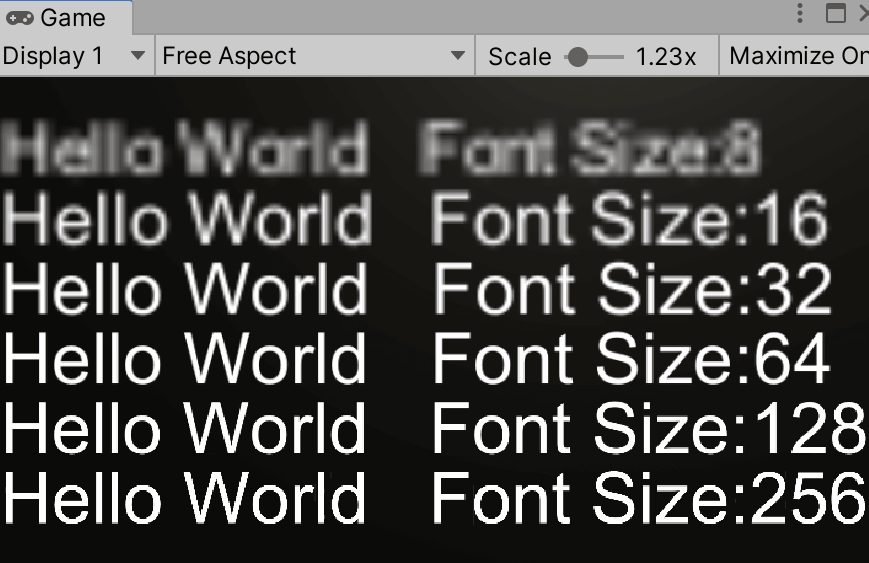
Text with Font Size of eight, sixteen, 32, 64, 128, and 256 from the top.
Increasing the Font Size will consume a lot of memory, and then information technology is recommended to use a Font Size of 64 or 128.
About Return Style
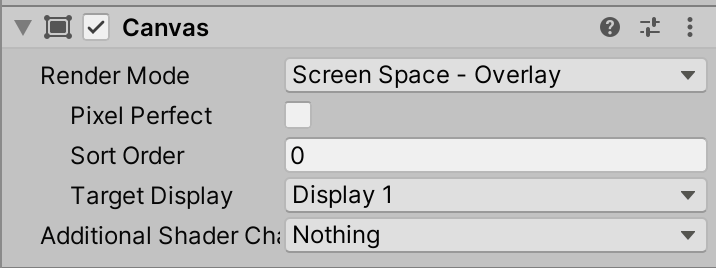
Inspector→Canvass.
In the Sheet Inspector, in that location is a belongings called "Render Mode" in the Sheet section.
At that place are two main Render Mode options: "World space" and "Screen infinite".
If you select "World infinite", y'all tin can identify the canvas in the scene.
World infinite text.
*If you lot select World space, y'all will go an error message if you don't select Outcome photographic camera, but you can ignore it if y'all don't desire to employ Sheet every bit UI.
If you select Screen space, Canvas will exist fixed on the screen or camera.
Screen Space text.
Screen space is a great advantage of creating text on Sheet.
These settings can likewise be applied to Text Mesh Pro as described below.
How to Create 3D Text
Click on GameObject at the top of the screen and select 3D Object→3D Text.
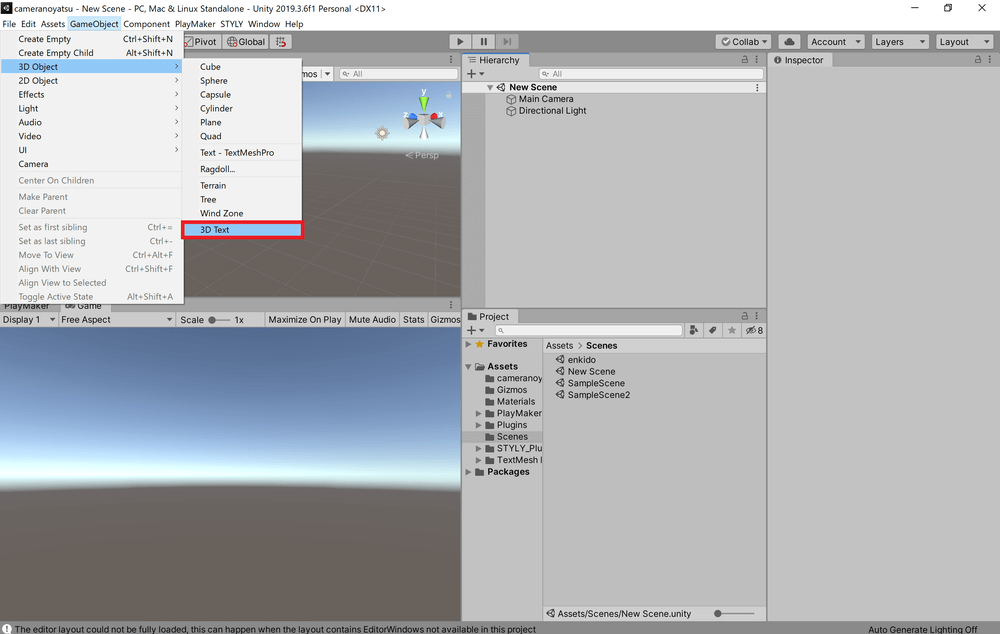
Click on the GameObject from the tab at the tiptop of the screen and select 3D Object→3D Text.
You tin can then create a New Text in the scene.
You lot can rename it equally yous similar.
Inspector Settings
The Inspector of the text you created contains a component chosen "Text Mesh".
Past modifying the inside of this component, you can requite diverse changes to the text.

Inspector→Text Mesh.
The following table summarizes the most unremarkably used backdrop of Text Mesh.
| Belongings Proper name | Description |
| Text | Allows you lot to enter text. |
| Beginning Z | Allows you to change how much the text is displaced from the specified coordinates in the z centrality when drawn. |
| Grapheme Size | Allows y'all to modify the size of the text. |
| Line Spacing | Allows you to change the line spacing. |
| Anchor | Allows you to adjust the position of the anchor. |
| Alignment | Allows y'all to alter the alignment of the text to left, heart, or correct. |
| Tab Size | Allows yous to change the width of the tab character. |
| Font Size | Allows you to modify the resolution of the text. |
| Font Style | Allows you to change the text to assuming, italic, etc. |
| Rich Text | If checked, tags tin be used. |
| Font | Allows yous to change the font of the text. |
| Colour | Allows you to change the color of the unabridged text. |
When the Text is Blurred
If the text displayed in 3D Text is blurry and difficult to read, yous can better it past increasing the Font Size value of the Text Mesh component and decreasing the Grapheme Size value of the Text Mesh component or the Calibration value in Transform.
Text with Font Size of viii, xvi, 32, 64, 128, 256 from the summit.
If you lot increase the Font Size, it will consume a lot of memory, and so information technology is recommended to use a Font Size of 64 or 128.
Text is Displayed at the Forefront
3D text will appear in front of the camera regardless of its position in relation to other objects.
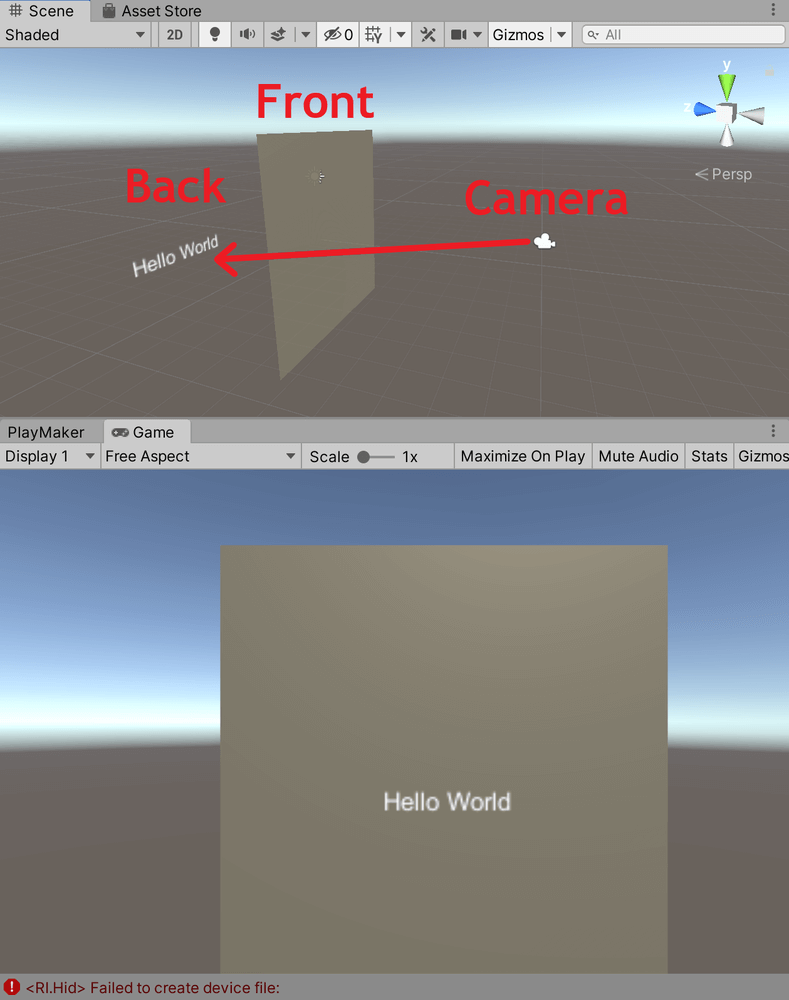
The plane is in front of the camera and the 3D text is at the back, but in the camera image, the 3D text appears to exist in front through the aeroplane.
This can be remedied by using Text Mesh Pro (see below).
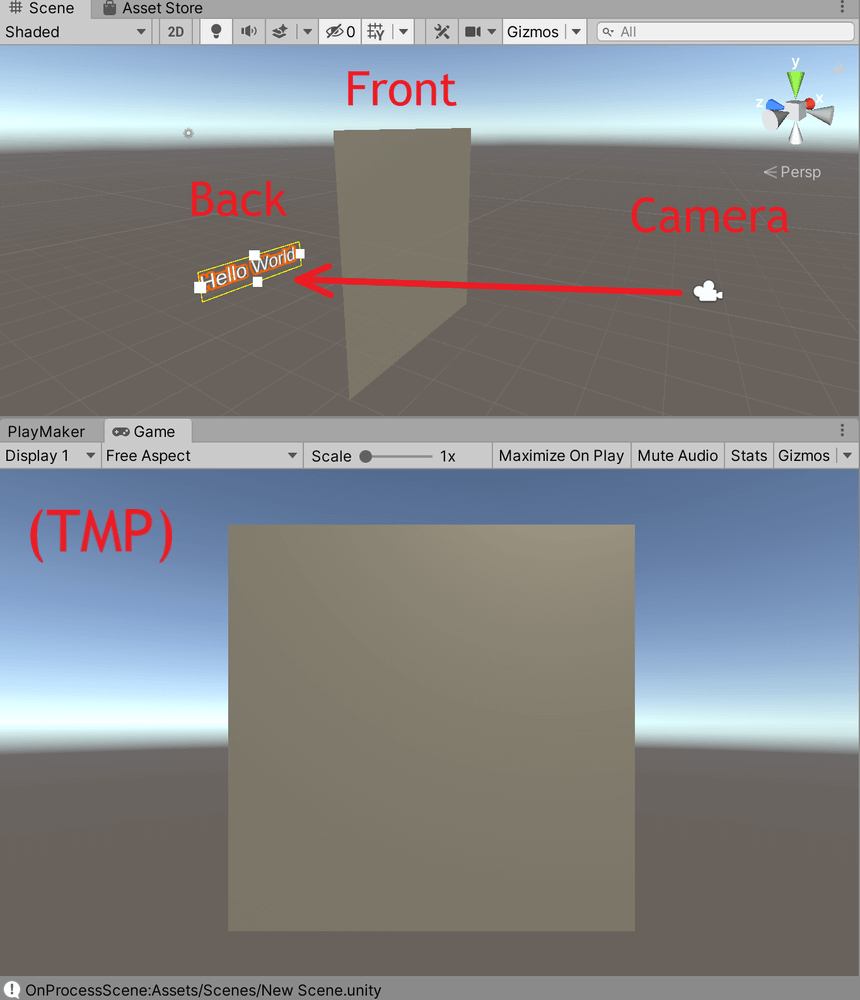
The plane is in the foreground and the 3D Text (TMP) is in the background, and the 3D Text (TMP) is hidden behind the plane in the camera image.
There are many advantages to using Text Mesh Pro, delight read the second one-half of the article if you are interested.
How to Alter or Add Fonts
Changing the Font
Clicking on the round symbol of the Font property contained in the Text component or the Text Mesh component volition open a window to select a font.

Click on the round symbol of the Font property in the Text Inspector.
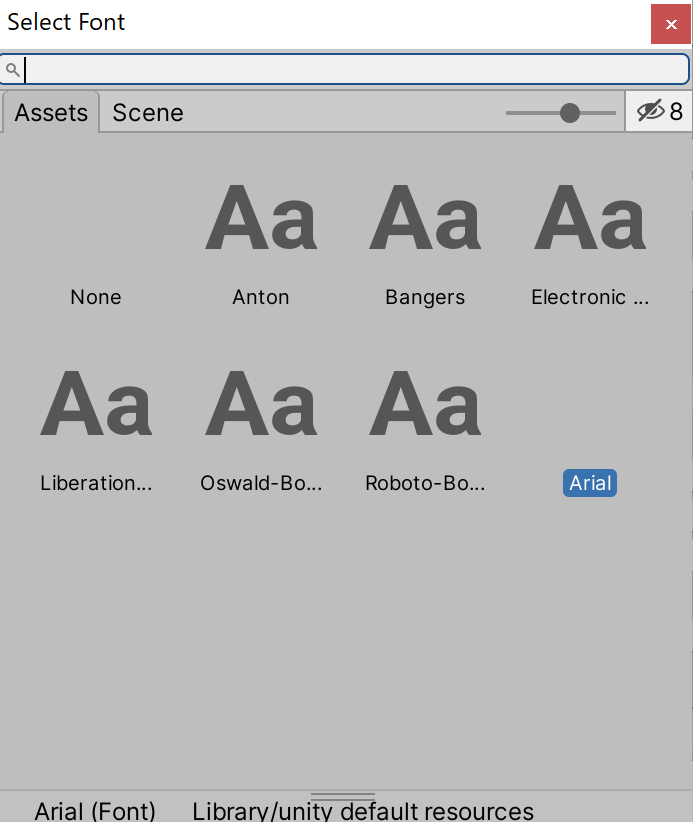
The window for selecting a font.
Yous can modify the font of your text past double-clicking on the font y'all desire to apply from this list.
Adding a Font
Prepare a ttf file or otf file of the font you desire to use.
Drag and drib the prepared file to Unity'southward Project view.
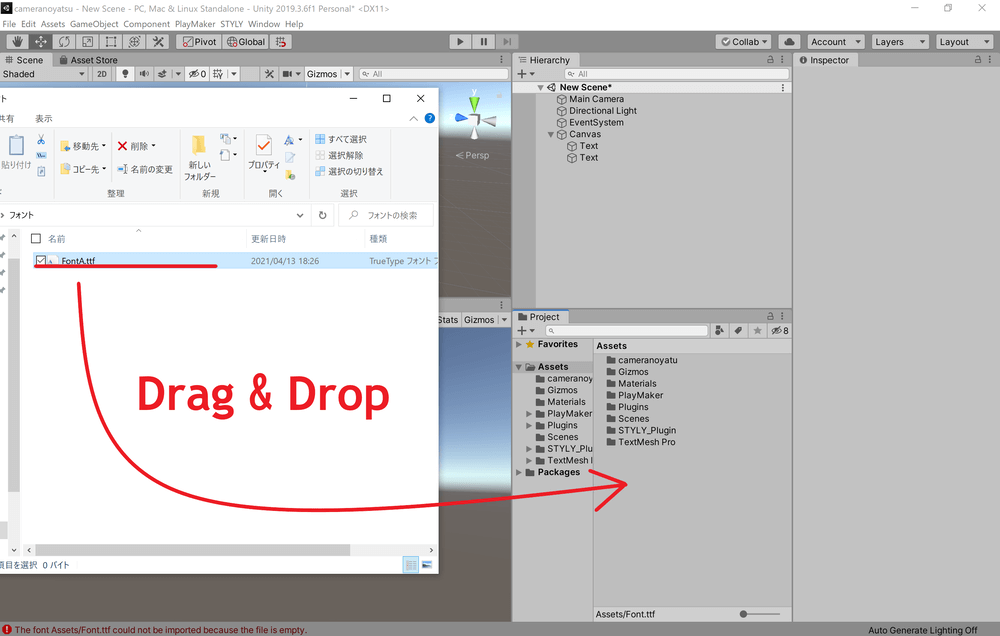
Elevate and drop the file to Unity's Project view.
The chosen font will exist reflected in the Project view and the font you added when selecting the font volition exist displayed.
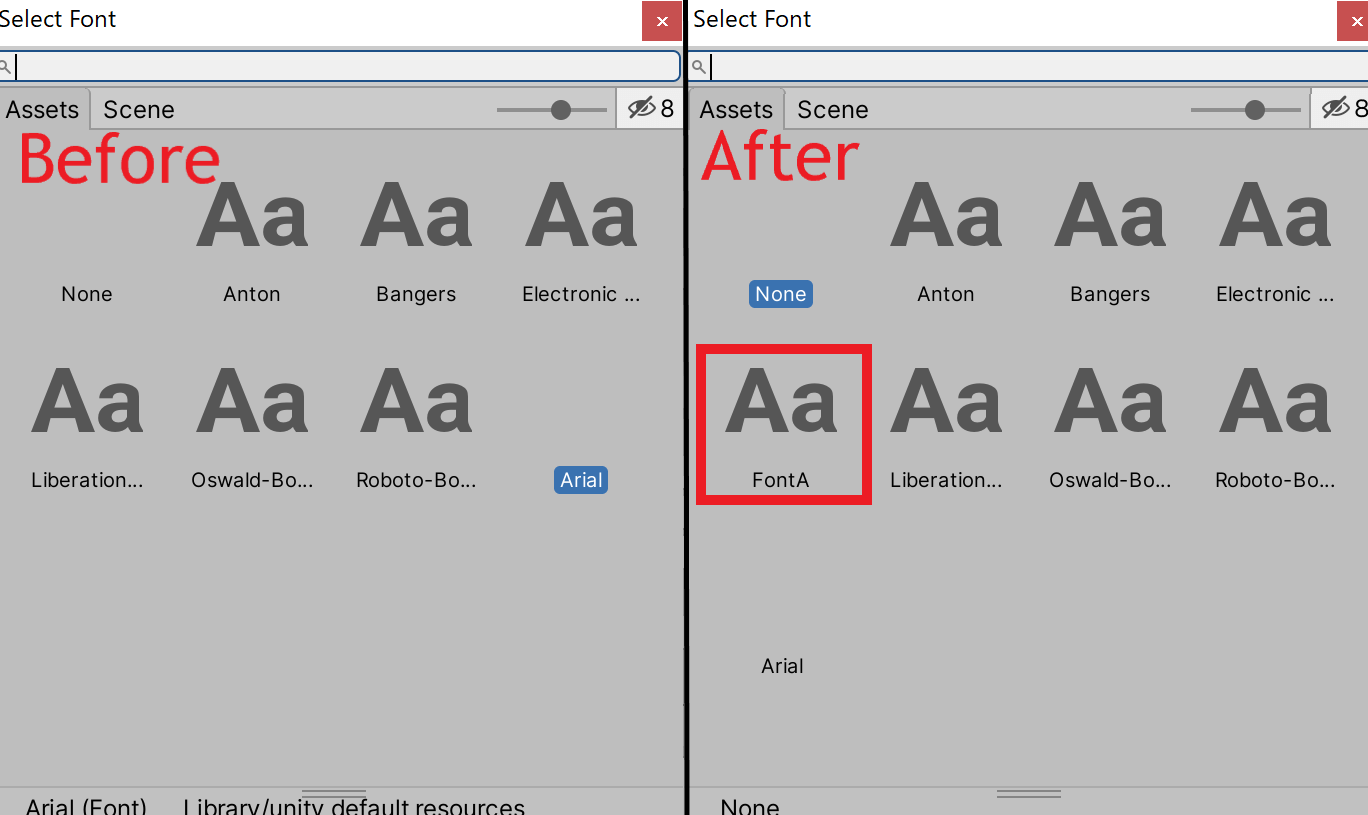
The added font volition be displayed when selecting a font.
Placing Text Using Text Mesh Pro
With Text Mesh Pro, you tin can identify text in your scene with less blur, the text will be displayed correctly fifty-fifty when it is placed every bit 3D text, and the text decoration can be made more attractive.
Zoomed-in comparison of normal text and Text Mesh Pro text.

Text with various decorations added.
How to Install Text Mesh Pro
When you create a Text Mesh Pro text for the offset time, you will run across the following window.
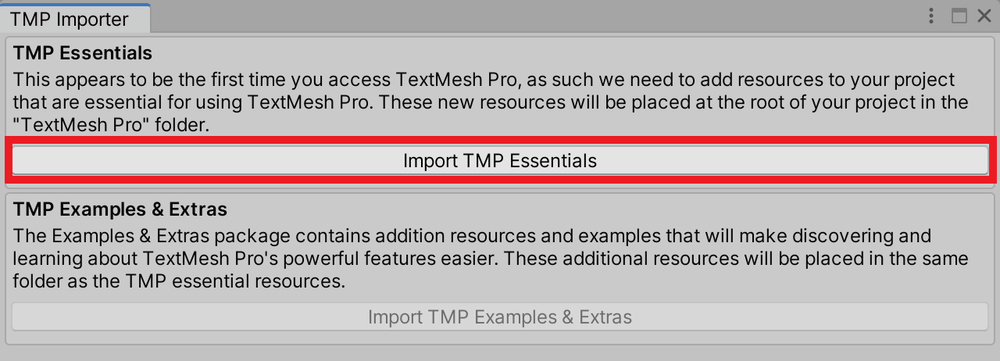
Click "Import TMP Essentials".
Click "Import TMP Essentials" in the ruby-red frame of the image, and Text Mesh Pro will exist available.
How to Create a Text
When you lot use Text Mesh Pro, the way to create a text is well-nigh the aforementioned as the default text feature. Yous tin either create a Text(TMP) on Canvas or a 3D Text(TMP).
Both methods volition be explained below.
How to Create Text(TMP) on Canvas
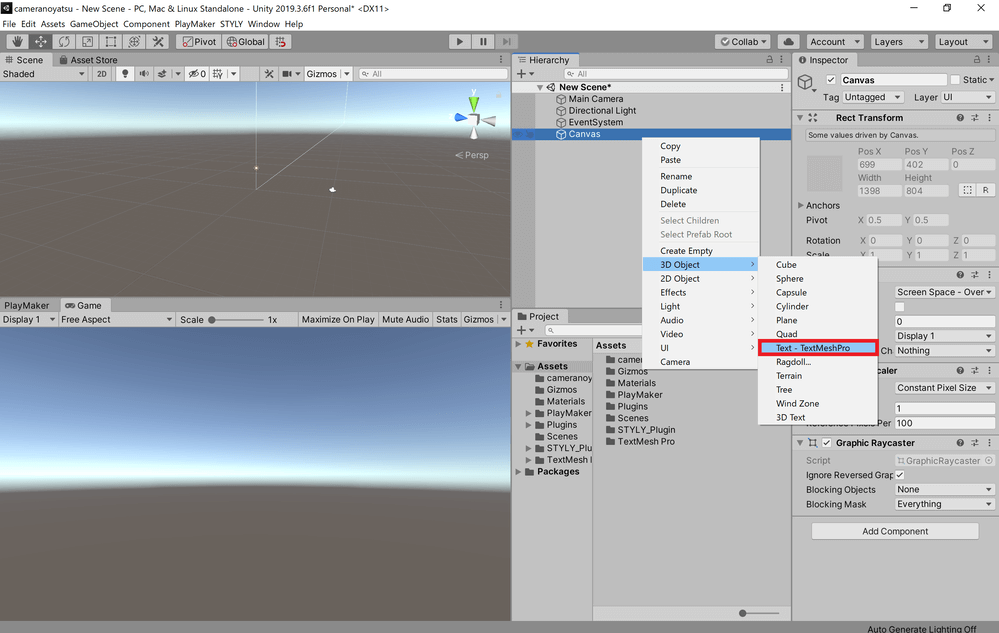
If at that place is no Canvas in the scene, click GameObject at the height of the screen, and select UI→Text – TextMeshPro.
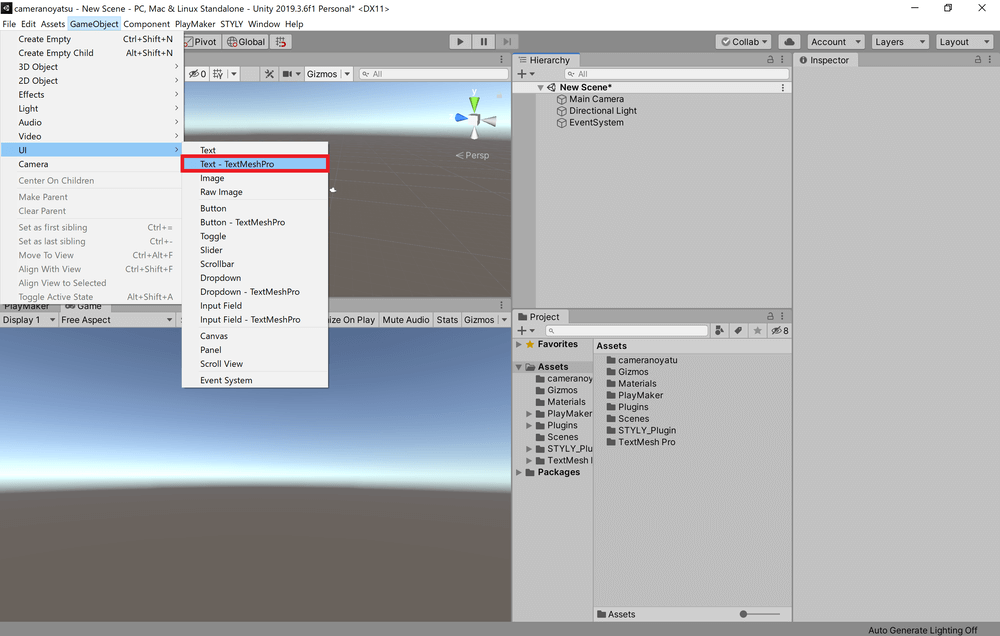
Click on GameObject from the tab at the top of the screen and select UI→Text – TextMeshPro.
At this time, a new Canvas is created at the same time as the Text (TMP).
If you already have a Canvas in your scene, right-click on the Canvas you lot want to add text to in the Bureaucracy window and select UI→Text – TextMeshPro.
Right-click on the Canvas and select UI→Text – TextMeshPro.
Besides, you tin can rename the newly created Text (TMP) and Canvas equally you wish.
How to Create a 3D Text (TMP)
Click on GameObject from the tab at the tiptop of the screen and select 3D Object→Text – TextMeshPro.

Click on GameObject from the tab at the superlative of the screen and select 3D Object→Text – TextMeshPro.
You lot tin can so create a Text (TMP) in your scene.
You tin rename information technology as you lot similar.
Setting upwardly Text Mesh Pro
In the Inspector for the created text, there is a component called "TextMeshPro – Text".
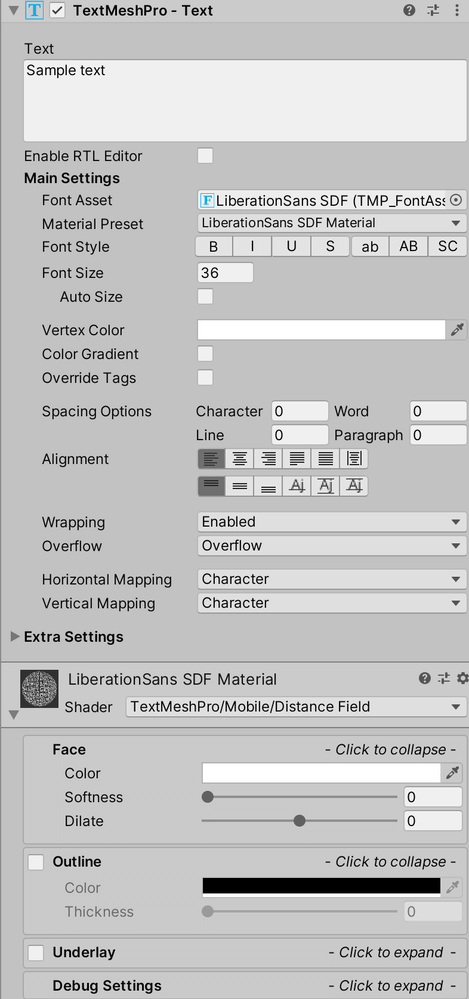
TextMeshPro – Text component.
By modifying this component, you can make various changes to the text.
The following table summarizes the well-nigh normally used properties of TextMeshPro – Text.
| Property Name | Discription |
| Text | Allows yous to enter a text sentence. |
| Enable RTL Editor | When checked, text tin can exist written from right to left. |
| Font Asset | Allows y'all to change the font of the text. |
| Material Preset | Allows you to modify the cloth of the text. |
| Font Fashion | Allows you to change text to bold, italic, etc., and add underlines and strikethroughs. You can also change all letters to capital or lowercase, or capitalize all letters and make only the outset alphabetic character of a word larger. |
| Font Size | Allows you to alter the size of the text. |
| Motorcar Size | If checked, the text size will be automatically adjusted co-ordinate to the bachelor space. You lot can also fix the maximum font size for motorcar-aligning. |
| Vertex Colour | Allows you to change the base color of the text vertices. |
| Color Gradient | If checked, a gradient color will be practical on summit of the base colour selected in Vertex Colour. You lot can gear up the gradient colour by yourself or select a preset. |
| Override Tags | If checked, the color set in the backdrop will have precedence even if y'all enter color tags in the text. |
| Spacing Options | Allows y'all to change the size of the spaces between characters, words, lines, and sentences. |
| Alignment | Allows you lot to alter the alignment of text in a detailed mode, using a combination of horizontal and vertical alignment. |
| Wrapping | When enabled, wraps text. |
| Overflow | Allows you lot to change how the text beyond the specified edge will be displayed. |
| Horizontal Mapping Vertical Mapping | Allows you to change how the text face and outline textures are mapped. |
| Margins | Allows you to alter the distance between the text and the specified edge. |
| Sorting Layer | Allows yous to change the Sorting Layer. |
| Order in Layer | Sorting Allows you to change the order of the columns in the layer. |
| Orthographic Way | If checked, perspective correction will non exist practical when using an orthographic camera. |
| Rich Text | If checked, tags tin can exist used. |
| Parse Escape Character | Bank check this box to brandish strings such as "\n" as an escape grapheme. If unchecked, strings such as "\due north" will be displayed as is. |
| Sprite Asset | Allows y'all to select a Sprite Asset. |
| Kerning | If checked, spaces between characters will be fabricated graphic symbol-specific. |
| Extra Padding | Check the Extra Padding checkbox to add whitespace between the text and the edge of the text mesh. This will reduce the adventure of graphic errors when displaying small text. |
How to Modify the Font
Prepare a ttf or otf file of the font you want to use.
Elevate and drop the prepared file to the Project view of Unity.
Drag and drop the file to Unity's Project view.
The font will then be reflected in the Project view.
Next, click "Window" from the tab at the top of the screen, and select "TextMeshPro -> Font Asset Creator" to open the "Font Asset Creator" window.
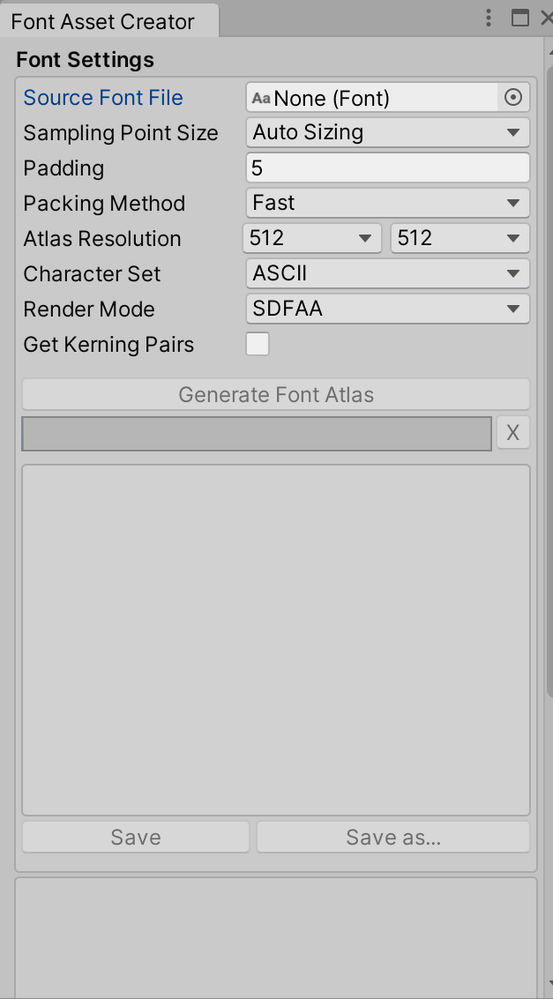
Font Asset Creator.
Change the "Source Font File" to the font you lot have added.
If the font you want to add is only available in English, click "Generate Font Atlas".
If you lot want to use a font that is not added by default, such as Japanese, alter the Graphic symbol Set to Custom Characters, enter the characters you want to use in the Custom Character Listing that appears below the Character Set, and click Generate Font Atlas.
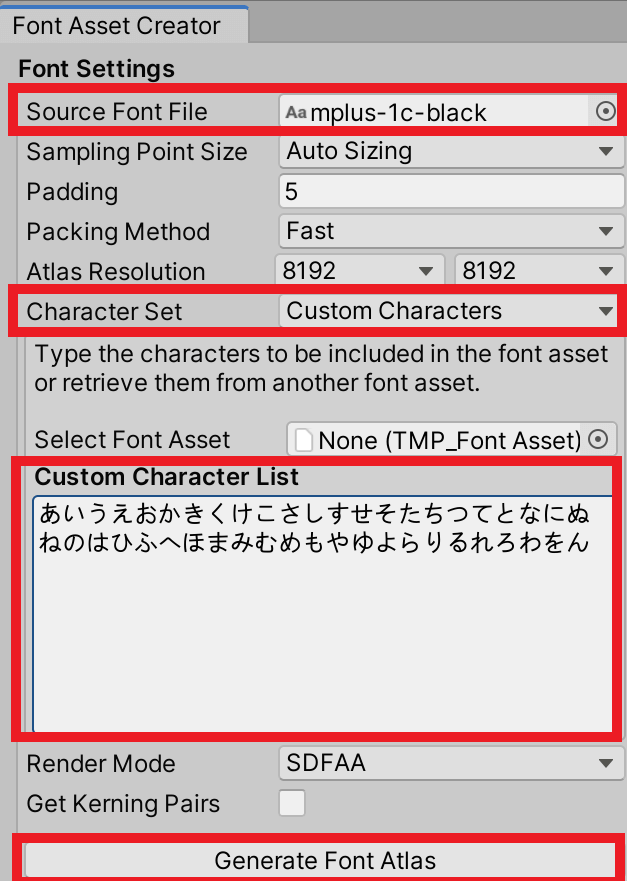
Font Asset Creator Settings for adding Japanese fonts, etc.
You volition run into the generated font image and the result of font generation in the window.

Later generating Font Nugget Creator.
*If y'all encounter characters under "Characters missing from font file", it ways that the characters y'all meet are not included in the original font file and the generation failed.
*If the generated font image is strongly blurred, or if characters are displayed under "Characters excluded from packing" and are not included in the generated font image, the value of "Atlas Resolution" may not be sufficient. If the characters are displayed under the "Atlas Resolution" and are non included in the generated font image, the value of "Atlas Resolution" may be insufficient, so increment the value and try to generate again.
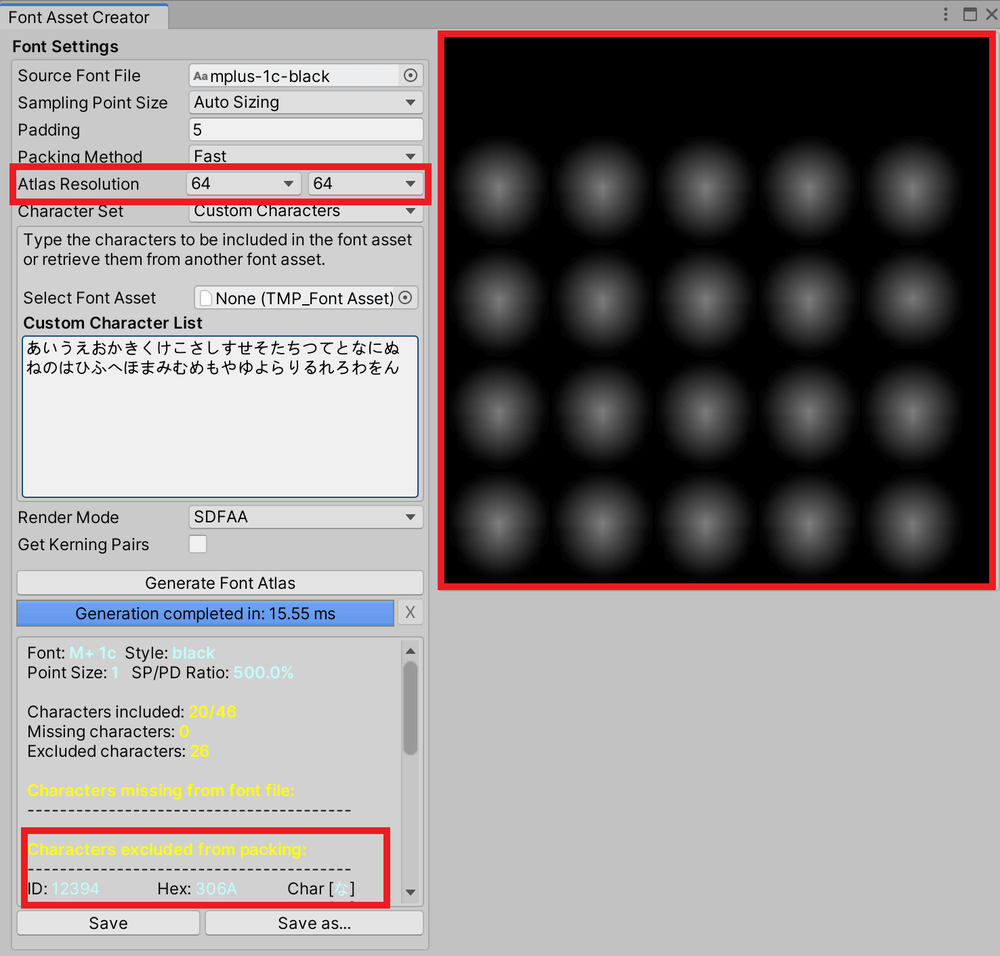
Case of failure after generating Font Asset Creator.
Click "Save" or "Save equally…" to save the font. You tin select the newly created font asset from the Font Asset holding in the Inspector of Text Mesh Pro.
How to Upload to STYLY
Allow'southward upload the 3D model to STYLY.
*3D Text or 3D Text(TMP) can exist prefabricated in Unity and uploaded to STYLY, but other text needs to be uploaded to STYLY for the whole scene, so please be conscientious when uploading.
Create a STYLY account
How to create a STYLY account
How to upload to STYLY
How to upload to STYLY from Unity

Source: https://styly.cc/tips/tomo-unity-textmeshpro/
Posted by: schoenbergcontly.blogspot.com
0 Response to "How To Prevent Text Changes In C#"
Post a Comment